Effortlessly Learn AutoCAD Navigational Tools: Tips for Zoom, Pan, and Selection

For beginners it can be a daunting task to navigate in AutoCAD. However, if you master the essential navigational tools in AutoCAD, you can enhance efficiency and productivity. In this blog I will cover various AutoCAD navigational tools such as Zoom, Selection and Pan.
Object Selection
Mastering selection techniques in AutoCAD is important for efficient drafting and designing. A good AutoCAD user will use a combination of selection techniques depending on the task at hand. Being proficient in these techniques will not only increase productivity but also ensure designs are accurate and meet the requirements. To become a pro in AutoCAD selection you will learn it in 3 steps: Basic Selection, Intermediate Selection and Advanced Selection.
On a basic level, you must know 3 things: how to select an individual object, how to select multiple objects and how to remove an object selection. To select an object in AutoCAD, you can simply hoover your cursor over an object and left click on it. To select multiple objects, you can then continue to left click on more objects. More ways to select multiple objects will be discussed later. Now to remove the selection all-together, you can hit ESC key and your current selection will be unselected. Its also possible to unselect only one or few items during multiple selection. Simply hold Shift key and click on the selected objects that you want to unselect.
On an intermediate level, you must master the selection window, crossing window, crossing lasso selection, and window lasso selection.
In a window selection, you left-click once and drag your cursor from left to right to create a rectangular window. All the objects that are entirely inside the window will be selected. In a cross-selection, you left-click once and drag your cursor from right to left to create a rectangular window. All the objects that touch the selection will be selected.
The rectangular window created in the window selection is blue, and the rectangular window created in the crossing window is green, a key difference to note apart from what the selection window selects. Let’s now come to lasso selections. The difference between a window and a lasso selection is that a window selection is rectangular, while a lasso selection is a free-form.
Lastly, to master selection in AutoCAD, you must be proficient at All Selection Method, Select Similar, Quick Select and Selection Cycle.
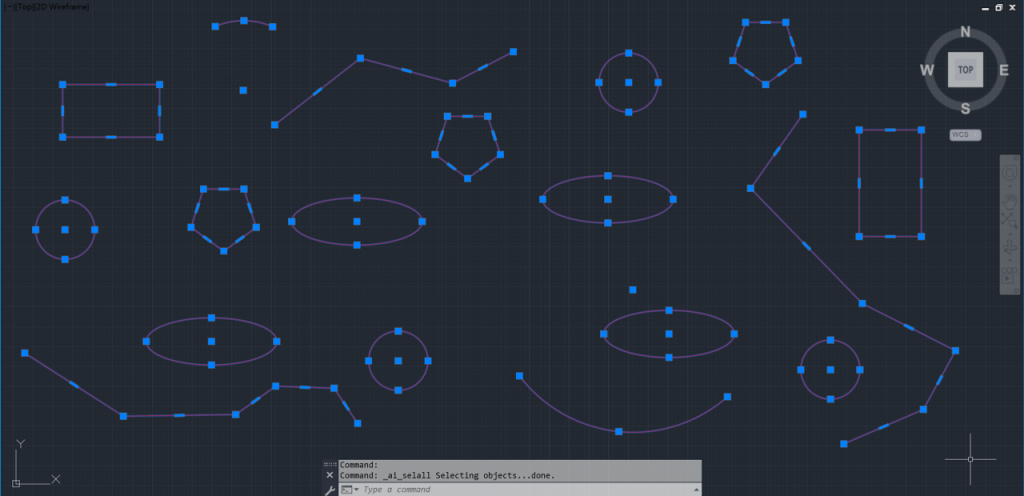
To select all objects in AutoCAD, you can hit CTRL+A. This will select all the objects that are not frozen or not on a locked layer. As usual, hit ESC once you would want to cancel all selected objects.
Select Similar and Quick Select are handy to select similar objects. With Select Similar, you can quickly select objects of the same type. With Quick Select, you can select objects based on various properties such as Color, Layer, Linetype, Linetype Scale, Plot Style, Lineweight, Transparency, and Hyperlink.

The selection Cycle is useful for selecting overlapping objects. When the selection cycle mode is turned on, you can decide which overlapping objects you want to select. You can activate the selection cycle from the Status Bar.
Zoom
In AutoCAD, the zoom command is a commonly used function that allows you to magnify or reduce the view of your drawing. You can use the mouse scroll wheel to zoom in by scrolling up and to zoom out by scrolling down. There are also several zoom options on the navigation bar. Lets start by learning about Zoom In, Zoom Out, Zoom Extents, Zoom Window, and Zoom Previous. These are frequently used for specific zooming purposes.
- Zoom In: Zooms into the drawing area.
- Zoom Out: Zooms out of the drawing area.
- Zoom Extents: This adjusts the view to display objects of the entire drawing in the drawing area. You can also zoom in by double-clicking your mouse wheel. If the drawing is empty, the drawing will zoom into the limits.
- Zoom Window: Zooms into a specific part of the drawing by making a rectangular window.
- Zoom Previous: Reverts back to the previous zoom state of the drawing.
Now, we will focus on the remaining zoom commands. These commands exist, but you may not use them daily. They are good to know and would be useful once in a while.
- Zoom Realtime: Enables continuous zooming as you move the mouse.
- Zoom All: Updates the magnification of the drawing to fit all the objects or the drawing limits, based on whichever is greater.
- Zoom Dynamic: Magnification is determined by the rectangular area selected. Unlike the zoom window, you can create the zoom rectangle multiple times and press enter when you are satisfied with the selection.
- Zoom Scale: The magnification of the drawing area is changed based on the scale factor is provided.
- Zoom Center: Zooms relative to a center point and height provided.
- Zoom Object: Zooms to fit the selected objects in the drawing area
Pan
The pan tool allows AutoCAD users to move around in the drawing area. There are three major ways with which you can pan. First, you can hold down the scroll button on your mouse and drag it to move around in your drawing. Second, you can activate the Pan command in the navigation toolbar. Lastly, you can type in PAN in the command line and activate the panning in the drawing. While panning in your AutoCAD drawing, you can also scroll in and out by moving the mouse wheel.
Using a Mouse in a nutshell
In AutoCAD, the mouse is essential for navigating the interface. The left click is primarily used for selecting objects, while the mouse wheel serves the dual purpose of zooming and panning. Additionally, the right click opens a menu with various options and commands, which we will delve into further in subsequent blogs.
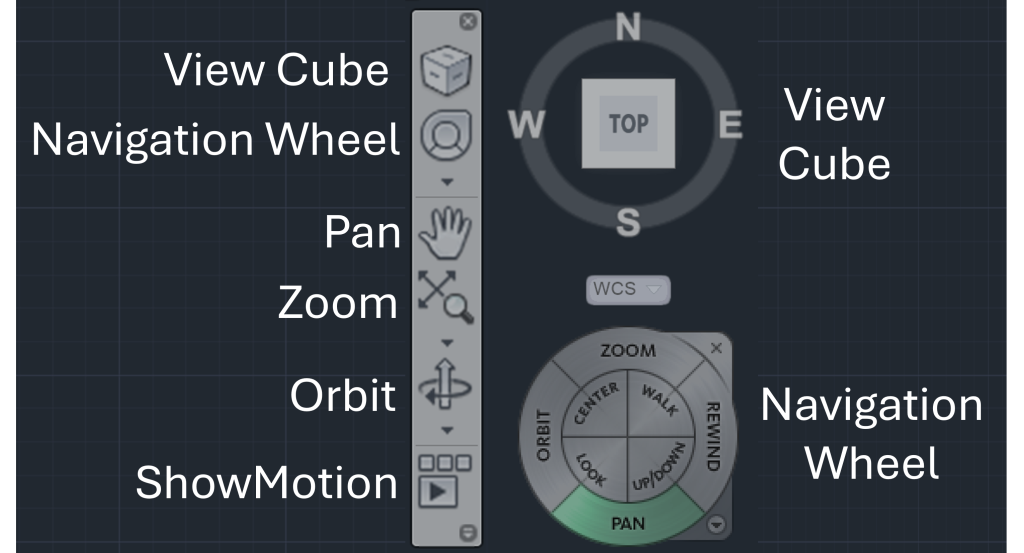
Other Tools in Navigation Bar
Apart from Zoom and Pan, the Navigation Bar consists of View Cube, Navigation Wheel, Orbit and Show Motion. These tools are particularly beneficial when working in 3D modeling. The View Cube facilitates model rotation into standard views like top, bottom, left, right, front, back, and isometric views. The Navigation Wheel combines navigation functionalities such as Zoom, Pan tool, and Orbit. The Orbit tool enables users to rotate and examine models from different angles, while the Show Motion tool allows the creation of model animations.
Frequently Asked Questions
What’s the difference between window and crossing selection?
In a window selection, only the objects that are completely inside the selection window are selected. In a crossing selection, any object that is even partially inside the selection window will also be selected. To start a window selection, you go from left to right and to start a cross selection you go from right to left. The window selection window is blue in color and the cross selection window is green in color.

What is the PICKADD variable and how it affects selection?
The PICKADD variable is set to 2 by default, which means that each object selected either individually or by window, gets added to the selection set. If the SELECT command was used to select objects, the selection will remain in place even after the command ends. If the PICKADD variable is set to 1, it has all the features as in variable 2 with the exception that if SELECT command is used to select objects, the selection will not remain in place after command ends.
When the PICKADD variable is set to either 0 or 3, you can only select one object at a time. When you select a new object, the previously selected objects are removed from the selection set. The difference lies in the fact when no objects are selected and you use SHIFT to select objects, the previously selected objects are removed from the selection set if the variable is 0 and the previously selected objects are not removed from the selection set if the variable is 3. Check out AutoCAD documentation on PICKADD for more info.
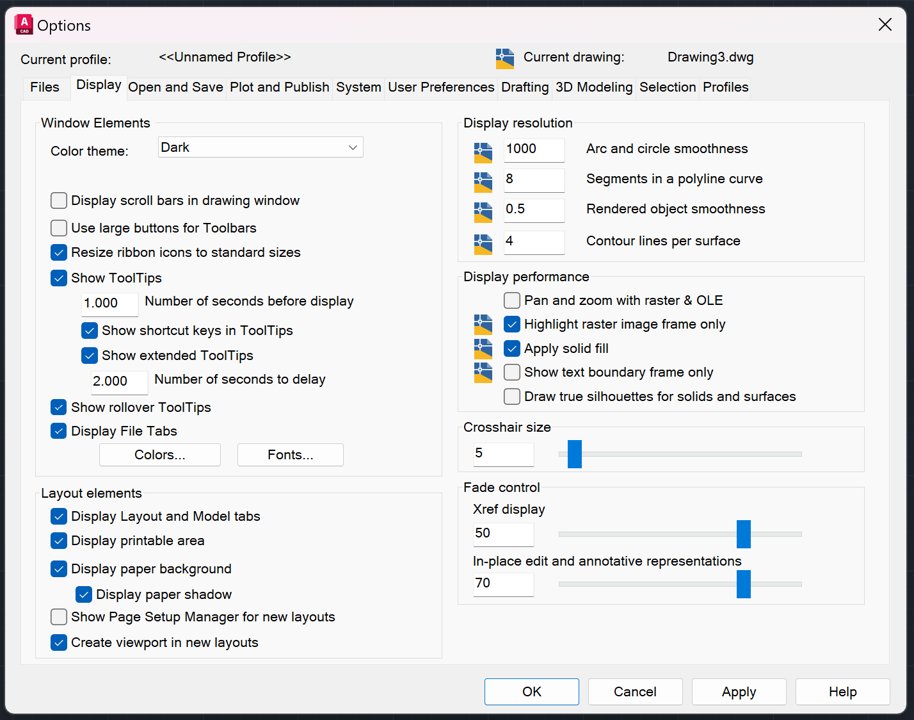
Is it possible to change the size of the Crosshairs?
You can update the size hair of the crosshairs by typing OP or OPTIONS in command line. This will open the Options Dialog Box. Now click on the Display tab and you will see an option for crosshair in bottom half of the right panel. Either enter a value for Crosshairs or drag the bar to increase or decrease the size of crosshair.
Hope you enjoyed learning about Navigational Tools in AutoCAD. If you are interested in mastering the fundamentals of AutoCAD, feel free to checkout 25 Foundational Concepts of AutoCAD.